几个月前,JS1k游戏制作节(JS1K game jam)传出不再举办消息后,许多游戏迷开始哀嚎。

Frank Force 也是其中一位,但他还有另一层身份——一位德克萨斯州奥斯汀的独立游戏设计师。Frank Force 在游戏行业工作了20年,参与过9款主流游戏、47个独立游戏的设计。在听到这个消息后,他马上和其他开发朋友讨论了这个问题,并决定做点什么为此纪念。
在此期间,他们受到三重因素的启发。一是赛车游戏,包括怀旧向的80年代赛车游戏,他们在非常早期的硬件上推动实时 3D 图形,所以作者沿用了相同的技术,用纯 JavaScript 从头开始实现做 3D 图形和物理引擎;还有一些现代赛车游戏带来了视觉设计的灵感,比如《Distance》和《Lonely Mountains: Downhill》;二是之前 Jake Gordon 用 JavaScript 创建一个虚拟3D赛车的项目,并分享了代码;三是 Chris Glover 曾经做过一款小到只有 1KB 的 JS1k 赛车游戏《Moto1kross by Chris Glover》。
于是 Frank 和他的朋友们决定做一个压缩后只有 2KB 的 3D 赛车游戏。2KB 到底有多小呢?提供一个参考,一个3.5英寸软盘可以容纳700多个这样的游戏。

他给这个游戏取名 Hue Jumper。关于名字的由来,Frank 表示,游戏的核心操作是移动。当玩家通过一个关卡时,游戏世界就会换一个颜色色调。“在我想象中,每通过过一个关卡,玩家都会跳转到另一个维度,有着完全不同的色调。”
做完这个游戏后,Frank 将包含了游戏的全部 JavaScript 代码都发布在他的个人博客上,其中用到的软件主要也是免费或开源软件的。游戏代码发布在 CodePen,可以在 iframe 中试玩,有兴趣的朋友可以去看看。

以下是原博内容,AI源创评论进行了不改变原意的编译:
因为严格的大小限制,我需要非常仔细对待我的程序。我的总体策略是尽可能保持一切简单,为最终目标服务。
为了帮助压缩代码,我使用了 Google Closure Compiler,它删除了所有空格,将变量重命名为1个字母字符,并进行了一些轻量级优化。
用户可以通过 Google Closure Compiler 官网在线跑代码。不幸的是,Closure Compiler 做了一些没有帮助的事情,比如替换模板字符串、默认参数和其他帮助节省空间的ES6特性。所以我需要手动撤销其中一些事情,并执行一些更“危险”的压缩技术来挤出最后一个字节空间。在压缩方面,这不算很成功,大部分挤出的空间来自代码本身的结构优化。
代码需要压缩到2KB。如果不是非要这么做不可,有一个类似的但功能没那么强的工具叫做 RegPack 。
无论哪种方式,策略都是一样的:尽最大可能重复代码,然后用压缩工具压缩。最好的例子是 c.width,c.height和 Math。因此,在阅读这段代码时,请记住,你经常会看到我不断重复一些东西,最终目的就是为了压缩。
其实我的游戏很少使用 html ,因为它主要用到的是 JavaScript 。但这是创建全屏画布 Canvas ,也能将画布 Canvas 设为窗口内部大小的代码最小方法。我不知道为什么在 CodePen 上有必要添加 overflow:hiddento the body,当直接打开时按理说也可以运行。
我将 JavaScript 封装在一个 onload 调用,得到了一个更小的最终版本…< body style = margin:0 onload = " code _ goes _ here " > < canvas id = c >但是,在开发过程中,我不喜欢用这个压缩设置,因为代码存储在一个字符串中,所以编辑器不能正确地高亮显示语法。
<body style=margin:0>
<canvas id=c>
<script>
有许多常量在各方面控制着游戏。当代码被 Google Closure 这样的工具缩小时,这些常量将被替换,就像 C++ 中的 #define 一样,把它们放在第一位会加快游戏微调的过程。
// draw settings
const context = c.getContext`2d`; // canvas context
const drawDistance = 800; // how far ahead to draw
const cameraDepth = 1; // FOV of camera
const segmentLength = 100; // length of each road segment
const roadWidth = 500; // how wide is road
const curbWidth = 150; // with of warning track
const dashLineWidth = 9; // width of the dashed line
const maxPlayerX = 2e3; // limit player offset
const mountainCount = 30; // how many mountains are there
const timeDelta = 1/60; // inverse frame rate
const PI = Math.PI; // shorthand for Math.PI
// player settings
const height = 150; // high of player above ground
const maxSpeed = 300; // limit max player speed
const playerAccel = 1; // player forward acceleration
const playerBrake = -3; // player breaking acceleration
const turnControl = .2; // player turning rate
const jumpAccel = 25; // z speed added for jump
const springConstant = .01; // spring players pitch
const collisionSlow = .1; // slow down from collisions
const pitchLerp = .1; // rate camera pitch changes
const pitchSpringDamp = .9; // dampen the pitch spring
const elasticity = 1.2; // bounce elasticity
const centrifugal = .002; // how much turns pull player
const forwardDamp = .999; // dampen player z speed
const lateralDamp = .7; // dampen player x speed
const offRoadDamp = .98; // more damping when off road
const gravity = -1; // gravity to apply in y axis
const cameraTurnScale = 2; // how much to rotate camera
const worldRotateScale = .00005; // how much to rotate world
// level settings
const maxTime = 20; // time to start
const checkPointTime = 10; // add time at checkpoints
const checkPointDistance = 1e5; // how far between checkpoints
const maxDifficultySegment = 9e3; // how far until max difficulty
const roadEnd = 1e4; // how far until end of road
鼠标是唯一的输入系统。通过这段代码,我们可以跟踪鼠标点击和光标位置,位置显示为-1到1之间的值。
双击是通过 mouseUpFrames 实现的。mousePressed 变量只在玩家第一次点击开始游戏时使用这么一次。
mouseDown =
mousePressed =
mouseUpFrames =
mouseX = 0;
onmouseup =e=> mouseDown = 0;
onmousedown =e=> mousePressed ? mouseDown = 1 : mousePressed = 1;
onmousemove =e=> mouseX = e.x/window.innerWidth*2 - 1;
这个游戏使用了一些函数来简化代码和减少重复,一些标准的数学函数用于 Clamp 和 Lerp 值。 ClampAngle 是有用的,因为它在 -PI 和 PI 之间 wrap angles,在许多游戏中已经广泛应用。
R函数就像个魔术师,因为它生成随机数,通过取当前随机数种子的正弦,乘以一个大数字,然后看分数部分来实现的。其实有很多方法可以做到,但这是最小的方法之一,而且对我们来说也是足够随机。
我们将使用这个随机生成器来创建各种程序,且不需要保存任何数据。例如,山脉、岩石和树木的变化不用存到内存。在这种情况下,目标不是减少内存,而是去除存储和检索数据所需的代码。
因为这是一个“真正的3D”游戏,所以有一个 3D vector class 非常有用,它也能减少代码量。这个 class 只包含这个游戏必需的基本元素,一个带有加法和乘法函数的 constructor 可以接受标量或向量参数。为了确定标量是否被传入,我们只需检查它是否小于一个大数。更正确的方法是使用 isNan 或者检查它的类型是否是 Vec3,但是这需要更多的存储。
Clamp =(v, a, b) => Math.min(Math.max(v, a), b);
ClampAngle=(a) => (a+PI) % (2*PI) + (a+PI<0? PI : -PI);
Lerp =(p, a, b) => a + Clamp(p, 0, 1) * (b-a);
R =(a=1, b=0) => Lerp((Math.sin(++randSeed)+1)*1e5%1,a,b);
class Vec3 // 3d vector class
{
constructor(x=0, y=0, z=0) {this.x = x; this.y = y; this.z = z;}
Add=(v)=>(
v = v < 1e5 ? new Vec3(v,v,v) : v,
new Vec3( this.x + v.x, this.y + v.y, this.z + v.z ));
Multiply=(v)=>(
v = v < 1e5 ? new Vec3(v,v,v) : v,
new Vec3( this.x * v.x, this.y * v.y, this.z * v.z ));
}
LSHA 通过模板字符串生成一组标准的 HSLA (色调、饱和度、亮度、alpha)颜色,并且刚刚被重新排序,所以更常用的 component 排在第一位。每过一关换一个整体色调也是通过这设置的。
DrawPoly 绘制一个梯形形状,用于渲染场景中的一切。使用 |0 将 Ycomponent 转换为整数,以确保每段多边形道路都能无缝连接,不然路段之间就会有一条细线。
DrawText 则用于显示时间、距离和游戏标题等文本渲染。
LSHA=(l,s=0,h=0,a=1)=>`hsl(${h+hueShift},${s}%,${l}%,${a})`;
// draw a trapazoid shaped poly
DrawPoly=(x1, y1, w1, x2, y2, w2, fillStyle)=>
{
context.beginPath(context.fillStyle = fillStyle);
context.lineTo(x1-w1, y1|0);
context.lineTo(x1+w1, y1|0);
context.lineTo(x2+w2, y2|0);
context.lineTo(x2-w2, y2|0);
context.fill();
}
// draw outlined hud text
DrawText=(text, posX)=>
{
context.font = '9em impact'; // set font size
context.fillStyle = LSHA(99,0,0,.5); // set font color
context.fillText(text, posX, 129); // fill text
context.lineWidth = 3; // line width
context.strokeText(text, posX, 129); // outline text
}

首先,我们必须生成完整的轨道,而且准备做到每次游戏轨道都是不同的。如何做呢?我们建立了一个道路段列表,存储道路在轨道上每一关卡的位置和宽度。轨道生成器是非常基础的操作,不同频率、振幅和宽度的道路都会逐渐变窄,沿着跑道的距离决定这一段路有多难。
atan2 函数可以用来计算道路俯仰角,据此来设计物理运动和光线。
roadGenLengthMax = // end of section
roadGenLength = // distance left
roadGenTaper = // length of taper
roadGenFreqX = // X wave frequency
roadGenFreqY = // Y wave frequency
roadGenScaleX = // X wave amplitude
roadGenScaleY = 0; // Y wave amplitude
roadGenWidth = roadWidth; // starting road width
startRandSeed = randSeed = Date.now(); // set random seed
road = []; // clear road
// generate the road
for( i = 0; i < roadEnd*2; ++i ) // build road past end
{
if (roadGenLength++ > roadGenLengthMax) // is end of section?
{
// calculate difficulty percent
d = Math.min(1, i/maxDifficultySegment);
// randomize road settings
roadGenWidth = roadWidth*R(1-d*.7,3-2*d); // road width
roadGenFreqX = R(Lerp(d,.01,.02)); // X curves
roadGenFreqY = R(Lerp(d,.01,.03)); // Y bumps
roadGenScaleX = i>roadEnd ? 0 : R(Lerp(d,.2,.6));// X scale
roadGenScaleY = R(Lerp(d,1e3,2e3)); // Y scale
// apply taper and move back
roadGenTaper = R(99, 1e3)|0; // random taper
roadGenLengthMax = roadGenTaper + R(99,1e3); // random length
roadGenLength = 0; // reset length
i -= roadGenTaper; // subtract taper
}
// make a wavy road
x = Math.sin(i*roadGenFreqX) * roadGenScaleX;
y = Math.sin(i*roadGenFreqY) * roadGenScaleY;
road[i] = road[i]? road[i] : {x:x, y:y, w:roadGenWidth};
// apply taper from last section and lerp values
p = Clamp(roadGenLength / roadGenTaper, 0, 1);
road[i].x = Lerp(p, road[i].x, x);
road[i].y = Lerp(p, road[i].y, y);
road[i].w = i > roadEnd ? 0 : Lerp(p, road[i].w, roadGenWidth);
// calculate road pitch angle
road[i].a = road[i-1] ?
Math.atan2(road[i-1].y-road[i].y, segmentLength) : 0;
}
现在跑道就绪,我们只需要预置一些变量就可以开始游戏了。
// reset everything
velocity = new Vec3
( pitchSpring = pitchSpringSpeed = pitchRoad = hueShift = 0 );
position = new Vec3(0, height); // set player start pos
nextCheckPoint = checkPointDistance; // init next checkpoint
time = maxTime; // set the start time
heading = randSeed; // random world heading
这是主要的更新功能,用来更新和渲染游戏中的一切!一般来说,如果你的代码中有一个很大的函数,这不是好事,为了更简洁易懂,我们会把它分几个成子函数。
首先,我们需要得到一些玩家所在位置的道路信息。为了使物理和渲染感觉平滑,需要在当前和下一个路段之间插入一些数值。
玩家的位置和速度是 3D 向量,并受重力、dampening 和其他因素等影响更新。如果玩家跑在地面上时,会受到加速度影响;当他离开这段路时,摄像机还会抖动。另外,在对游戏测试后,我决定让玩家在空中时仍然可以跑。
接下来要处理输入指令,涉及加速、刹车、跳跃和转弯等操作。双击通过 mouseUpFrames 测试。还有一些代码是来跟踪玩家在空中停留了多少帧,如果时间很短,游戏允许玩家还可以跳跃。
当玩家加速、刹车和跳跃时,我通过spring system展示相机的俯仰角以给玩家动态运动的感觉。此外,当玩家驾车翻越山丘或跳跃时,相机还会随着道路倾斜而倾斜。
Update=()=>
{
// get player road segment
s = position.z / segmentLength | 0; // current road segment
p = position.z / segmentLength % 1; // percent along segment
// get lerped values between last and current road segment
roadX = Lerp(p, road[s].x, road[s+1].x);
roadY = Lerp(p, road[s].y, road[s+1].y) + height;
roadA = Lerp(p, road[s].a, road[s+1].a);
// update player velocity
lastVelocity = velocity.Add(0);
velocity.y += gravity;
velocity.x *= lateralDamp;
velocity.z = Math.max(0, time?forwardDamp*velocity.z:0);
// add velocity to position
position = position.Add(velocity);
// limit player x position (how far off road)
position.x = Clamp(position.x, -maxPlayerX, maxPlayerX);
// check if on ground
if (position.y < roadY)
{
position.y = roadY; // match y to ground plane
airFrame = 0; // reset air frames
// get the dot product of the ground normal and the velocity
dp = Math.cos(roadA)*velocity.y + Math.sin(roadA)*velocity.z;
// bounce velocity against ground normal
velocity = new Vec3(0, Math.cos(roadA), Math.sin(roadA))
.Multiply(-elasticity * dp).Add(velocity);
// apply player brake and accel
velocity.z +=
mouseDown? playerBrake :
Lerp(velocity.z/maxSpeed, mousePressed*playerAccel, 0);
// check if off road
if (Math.abs(position.x) > road[s].w)
{
velocity.z *= offRoadDamp; // slow down
pitchSpring += Math.sin(position.z/99)**4/99; // rumble
}
}
// update player turning and apply centrifugal force
turn = Lerp(velocity.z/maxSpeed, mouseX * turnControl, 0);
velocity.x +=
velocity.z * turn -
velocity.z ** 2 * centrifugal * roadX;
// update jump
if (airFrame++<6 && time
&& mouseDown && mouseUpFrames && mouseUpFrames<9)
{
velocity.y += jumpAccel; // apply jump velocity
airFrame = 9; // prevent jumping again
}
mouseUpFrames = mouseDown? 0 : mouseUpFrames+1;
// pitch down with vertical velocity when in air
airPercent = (position.y-roadY) / 99;
pitchSpringSpeed += Lerp(airPercent, 0, velocity.y/4e4);
// update player pitch spring
pitchSpringSpeed += (velocity.z - lastVelocity.z)/2e3;
pitchSpringSpeed -= pitchSpring * springConstant;
pitchSpringSpeed *= pitchSpringDamp;
pitchSpring += pitchSpringSpeed;
pitchRoad = Lerp(pitchLerp, pitchRoad, Lerp(airPercent,-roadA,0));
playerPitch = pitchSpring + pitchRoad;
// update heading
heading = ClampAngle(heading + velocity.z*roadX*worldRotateScale);
cameraHeading = turn * cameraTurnScale;
// was checkpoint crossed?
if (position.z > nextCheckPoint)
{
time += checkPointTime; // add more time
nextCheckPoint += checkPointDistance; // set next checkpoint
hueShift += 36; // shift hue
}
在渲染之前,canvas 每当高度或宽度被重设时,画布内容就会被清空。这也适用于自适应窗口的画布。
我们还计算了将世界点转换到画布的投影比例。cameraDepth 值代表摄像机的视场(FOV)。这个游戏是90度。计算结果是 1/Math.tan(fovRadians/2) ,FOV 是90度的时候,计算结果正好是1。另外为了保持屏幕长宽比,投影按 c.width 缩放。
// clear the screen and set size
c.width = window.innerWidth, c.height = window.innerHeight;
// calculate projection scale, flip y
projectScale = (new Vec3(1,-1,1)).Multiply(c.width/2/cameraDepth);

空气背景是用全屏的 linear gradient (径向渐变)绘制的,它还会根据太阳的位置改变颜色。
为了节省存储空间,太阳和月亮在同一个循环中,使用了一个带有透明度的全屏 radial gradient(线性渐变)。
线性和径向渐变相结合,形成一个完全包围场景的天空背景。
// get horizon, offset, and light amount
horizon = c.height/2 - Math.tan(playerPitch)*projectScale.y;
backgroundOffset = Math.sin(cameraHeading)/2;
light = Math.cos(heading);
// create linear gradient for sky
g = context.createLinearGradient(0,horizon-c.height/2,0,horizon);
g.addColorStop(0,LSHA(39+light*25,49+light*19,230-light*19));
g.addColorStop(1,LSHA(5,79,250-light*9));
// draw sky as full screen poly
DrawPoly(c.width/2,0,c.width/2,c.width/2,c.height,c.width/2,g);
// draw sun and moon (0=sun, 1=moon)
for( i = 2 ; i--; )
{
// create radial gradient
g = context.createRadialGradient(
x = c.width*(.5+Lerp(
(heading/PI/2+.5+i/2)%1,
4, -4)-backgroundOffset),
y = horizon - c.width/5,
c.width/25,
x, y, i?c.width/23:c.width);
g.addColorStop(0, LSHA(i?70:99));
g.addColorStop(1, LSHA(0,0,0,0));
// draw full screen poly
DrawPoly(c.width/2,0,c.width/2,c.width/2,c.height,c.width/2,g);
}

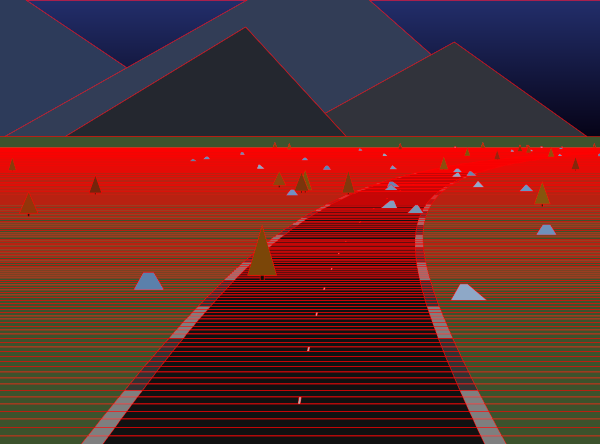
山脉是通过在地平线上画50个三角形,然后根据程序自己生成的。
因为用了光线照明,山脉在面对太阳时会更暗,因为它们处于阴影中。此外,越近的山脉颜色越暗,我想以此来模拟雾气。这里我有个诀窍,就是微调大小和颜色的随机值。
背景的最后一部分是绘制地平线,再用纯绿填充画布的底部。
// set random seed for mountains
randSeed = startRandSeed;
// draw mountains
for( i = mountainCount; i--; )
{
angle = ClampAngle(heading+R(19));
light = Math.cos(angle-heading);
DrawPoly(
x = c.width*(.5+Lerp(angle/PI/2+.5,4,-4)-backgroundOffset),
y = horizon,
w = R(.2,.8)**2*c.width/2,
x + w*R(-.5,.5),
y - R(.5,.8)*w, 0,
LSHA(R(15,25)+i/3-light*9, i/2+R(19), R(220,230)));
}
// draw horizon
DrawPoly(
c.width/2, horizon, c.width/2, c.width/2, c.height, c.width/2,
LSHA(25, 30, 95));
在渲染道路之前,我们必须首先获得投影的道路点。第一部分有点棘手,因为我们的道路的 x 值需要转换成世界空间位置。为了使道路看起来蜿蜒曲折,我们把x值作为二阶导数。这就是为什么有奇怪的代码“x+=w+=”出现的原因。由于这种工作方式,路段没有固定的世界空间位置,每一帧都是根据玩家的位置重新计算。
一旦我们有了世界空间位置,我们就可以从道路位置中知道玩家的位置,从而得到本地摄像机空间位置。代码的其余部分,首先通过旋转标题、俯仰角来应用变换,然后通过投影变换,做到近大远小的效果,最后将其移动到画布空间。
for( x = w = i = 0; i < drawDistance+1; )
{
p = new Vec3(x+=w+=road[s+i].x, // sum local road offsets
road[s+i].y, (s+i)*segmentLength) // road y and z pos
.Add(position.Multiply(-1)); // get local camera space
// apply camera heading
p.x = p.x*Math.cos(cameraHeading) - p.z*Math.sin(cameraHeading);
// tilt camera pitch and invert z
z = 1/(p.z*Math.cos(playerPitch) - p.y*Math.sin(playerPitch));
p.y = p.y*Math.cos(playerPitch) - p.z*Math.sin(playerPitch);
p.z = z;
// project road segment to canvas space
road[s+i++].p = // projected road point
p.Multiply(new Vec3(z, z, 1)) // projection
.Multiply(projectScale) // scale
.Add(new Vec3(c.width/2,c.height/2)); // center on canvas
}

现在我们有了每个路段的画布空间点,渲染就相当简单了。我们需要从后向前画出每一个路段,或者更具体地说,连接上一路段的梯形多边形。
为了创建道路,这里有4层渲染:地面,条纹路边缘,道路本身和白色虚线。每一个都是基于路段的俯仰角和方向来加阴影,并且根据该层的表现还有一些额外的逻辑。
有必要检查路段是在近还是远剪辑范围,以防止渲染出现 bug 。此外,还有一个很好的优化方法是,当道路变得很窄时,可以通过 distance 来减小道路的分辨率。如此,不仅减少了 draw count 一半以上,而且没有明显的质量损失,这是一次性能胜利。
let segment2 = road[s+drawDistance]; // store the last segment
for( i = drawDistance; i--; ) // iterate in reverse
{
// get projected road points
segment1 = road[s+i];
p1 = segment1.p;
p2 = segment2.p;
// random seed and lighting
randSeed = startRandSeed + s + i;
light = Math.sin(segment1.a) * Math.cos(heading) * 99;
// check near and far clip
if (p1.z < 1e5 && p1.z > 0)
{
// fade in road resolution over distance
if (i % (Lerp(i/drawDistance,1,9)|0) == 0)
{
// ground
DrawPoly(c.width/2, p1.y, c.width/2,
c.width/2, p2.y, c.width/2,
LSHA(25 + light, 30, 95));
// curb if wide enough
if (segment1.w > 400)
DrawPoly(p1.x, p1.y, p1.z*(segment1.w+curbWidth),
p2.x, p2.y, p2.z*(segment2.w+curbWidth),
LSHA(((s+i)%19<9? 50: 20) + light));
// road and checkpoint marker
DrawPoly(p1.x, p1.y, p1.z*segment1.w,
p2.x, p2.y, p2.z*segment2.w,
LSHA(((s+i)*segmentLength%checkPointDistance < 300 ?
70 : 7) + light));
// dashed lines if wide and close enough
if ((segment1.w > 300) && (s+i)%9==0 && i < drawDistance/3)
DrawPoly(p1.x, p1.y, p1.z*dashLineWidth,
p2.x, p2.y, p2.z*dashLineWidth,
LSHA(70 + light));
// save this segment
segment2 = segment1;
}

游戏有两种不同类型的物体:树和石头。首先,我们通过使用 R() 函数来确定是否加一个对象。这是随机数和随机数种子特别有意思的地方。我们还将使用 R() 为对象随机添加不同的形状和颜色。
最初我还想涉及其他车型,但为了达到 2KB 的要求,必须要进行特别多的削减,因此我最后放弃了这个想法,用风景作为障碍。这些位置是随机的,也比较靠近道路,不然它们太稀疏,就很容易行驶。为了节省空间,对象高度还决定了对象的类型。
这是通过比较玩家和物体在 3D 空间中的位置来检查它们之间的碰撞位置。当玩家撞到一个物体时,玩家减速,该物体被标记为“ hit ”,这样它就可以安全通过。
为了防止对象突然出现在地平线上,透明度会随着距离的接近而削弱。梯形绘图函数定义物体的形状和颜色,另外随机函数会改变这两个属性。
if (R()<.2 && s+i>29) // is there an object?
{
// player object collision check
x = 2*roadWidth * R(10,-10) * R(9); // choose object pos
const objectHeight = (R(2)|0) * 400; // choose tree or rock
if (!segment1.h // dont hit same object
&& Math.abs(position.x-x)<200 // X
&& Math.abs(position.z-(s+i)*segmentLength)<200 // Z
&& position.y-height<segment1.y+objectHeight+200) // Y
{
// slow player and mark object as hit
velocity = velocity.Multiply(segment1.h = collisionSlow);
}
// draw road object
const alpha = Lerp(i/drawDistance, 4, 0); // fade in object
if (objectHeight)
{
// tree trunk
DrawPoly(x = p1.x+p1.z * x, p1.y, p1.z*29,
x, p1.y-99*p1.z, p1.z*29,
LSHA(5+R(9), 50+R(9), 29+R(9), alpha));
// tree leaves
DrawPoly(x, p1.y-R(50,99)*p1.z, p1.z*R(199,250),
x, p1.y-R(600,800)*p1.z, 0,
LSHA(25+R(9), 80+R(9), 9+R(29), alpha));
}
else
{
// rock
DrawPoly(x = p1.x+p1.z*x, p1.y, p1.z*R(200,250),
x+p1.z*(R(99,-99)), p1.y-R(200,250)*p1.z, p1.z*R(99),
LSHA(50+R(19), 25+R(19), 209+R(9), alpha));
}
}
}
}

游戏的标题、时间和距离是用一个非常基础的字体渲染系统显示出来的,就是之前设置的 DrawText 函数。在玩家点击鼠标之前,它会在屏幕中央显示标题。
按下鼠标后,游戏开始,然后 HUD 会显示剩余时间和当前距离。时间也在这块更新,玩过此类游戏的都知道,时间只在比赛开始后减少。
在这个 massive Update function 结束后,它调用 requestAnimationFrame (Update) 来触发下一次更新。
if (mousePressed)
{
time = Clamp(time - timeDelta, 0, maxTime); // update time
DrawText(Math.ceil(time), 9); // show time
context.textAlign = 'right'; // right alignment
DrawText(0|position.z/1e3, c.width-9); // show distance
}
else
{
context.textAlign = 'center'; // center alignment
DrawText('HUE JUMPER', c.width/2); // draw title text
}
requestAnimationFrame(Update); // kick off next frame
} // end of update function
HTML 需要一个结束脚本标签来让所有的代码能够跑起来。
Update(); // kick off update loop
</script>
这就是整个游戏啦!下方的一小段代码就是压缩后的最终结果,我用不同的颜色标注了不同的部分。完成所有这些工作后,你能感受到我在2KB内就做完了整个游戏是多么让我满意了吗?而这还是在zip之前的工作,zip还可以进一步压缩大小。


当然,还有很多其他 3D 渲染方法可以同时保证性能和视觉效果。如果我有更多的可用空间,我会更倾向于使用一个 WebGL API 比如 three.js ,我在去年制作的一个类似游戏“Bogus Roads”中用过这个框架。此外,因为它使用的是 requestAnimationFrame ,所以需要一些额外的代码来确保帧速率不超过60 fps,增强版本中我会这么用,尽管我更喜欢使用 requestAnimationFrame 而不是 setInterval ,因为它是垂直同期的(VSyn,VerticalSynchronization),所以渲染更丝滑。这种代码的一个主要好处是它非常兼容,可以在任何设备上运行,尽管在我旧 iPhone 上运行有点慢。
游戏代码被我放到了 GitHub 上的 GPL-3.0 下(https://github.com/KilledByAPixel/HueJumper2k),所以你可以在自己的项目中自由使用它。该库中还包含 2KB 版本的游戏,准确说是2031字节!欢迎你添加一些其他的功能,比如音乐和音效到“增强”版本中。
雷锋网注意到,Frank Force 在个人博客发了这篇文章后,在内容、标题的加持下,这篇文章后来被不少国外媒体转载。在盛赞之余,也有质疑的声音。网友“Anon”在原文下评论:你是如何在 2KB 安装一个完整的 javascript 的,除非你可以随意忽略 dependencies 插件库的大小,或者你将整个游戏作为 dependency,大小才有可能控制到 2KB,否则就是欺骗。
Frank 回复表示,大多数 small demos 都需要某种运行环境,即使它是可执行的。在这种情况下,就是 javascript 运行时环境,没有其他 dependencies.。因为 javascript 是解释的,所以也可以说压缩后的代码是在2KB以内的。
雷锋网发现,有其他网友表示认可 Frank 的说法,他们认为 JS 是一种解释语言,不能将其与其他编译语言相比较。
雷锋网

正在生成分享图...
 nebula